
So you’ve treated yourself to a nice pair of AirPods, Apple’s Bluetooth earbuds based on custom silicon that enables low power consumption, reliable connections, automatic pairing, Hey Siri and other perks. To master them, follow our tutorial showing you how to use your AirPods like a pro.
Video: AirPods tips and tricks
If you prefer a quick hands-on video walkthrough over a written tutorial, feel free to watch our AirPods tips’n’tricks video embedded below, courtesy of iDB’s videographer Harris Craycraft.
Subscribe to iDownloadBlog on YouTube
For a more detailed overview of everything you can do with your AirPods, continue reading our full AirPods tutorial that follows right ahead.
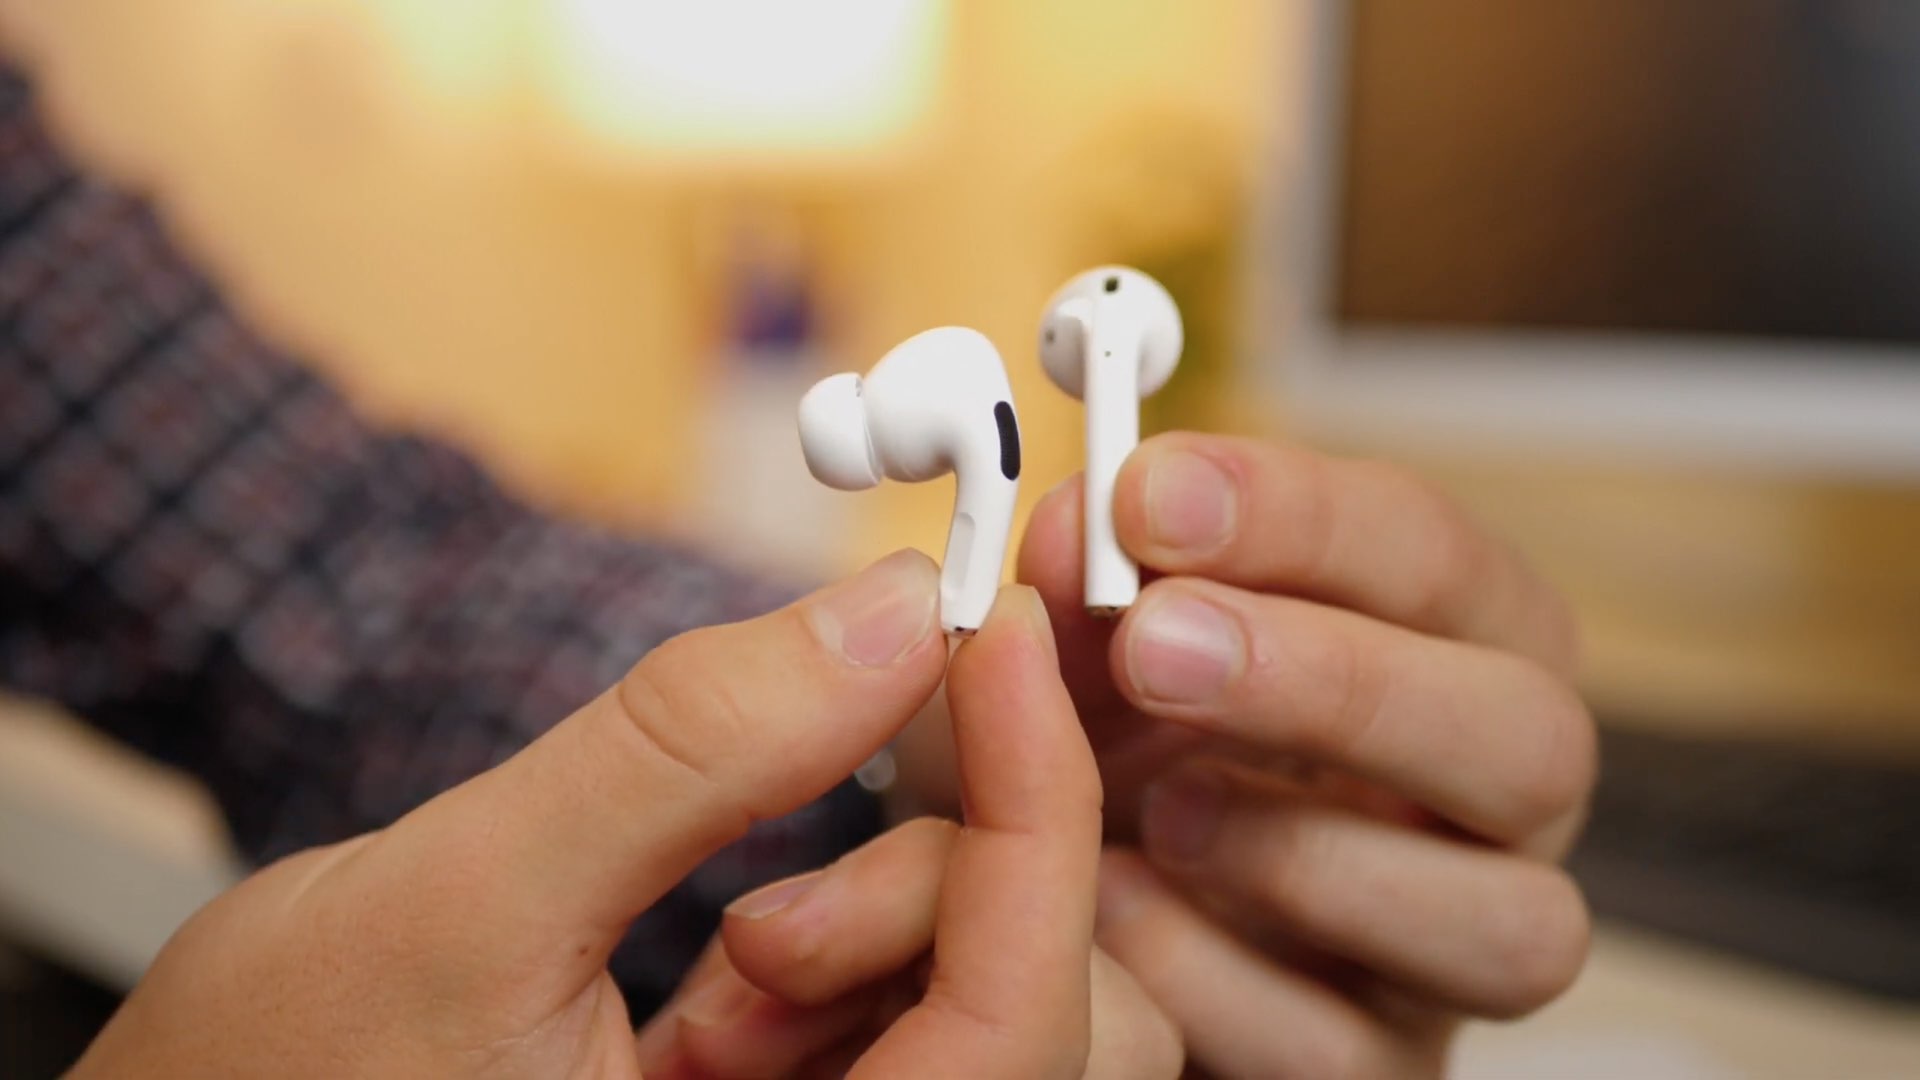
Say hello to your AirPods
Your AirPods are intuitive to use right out of the box.
That’s because they feature zero-configuration pairing, automatic ear detection, Hey Siri, touch gestures and seamless switching between devices. Just because they use Apple’s custom H1 headphone chip doesn’t mean they’re exclusive to Apple hardware. Quite the contrary, the AirPods work just like any standard Bluetooth earbuds when used on non-Apple devices. In that case, however, you‘ll lose Apple-specific smarts, including Hey Siri support and one-tap pairing.
AirPods models
Apple offers these two AirPods models:
- AirPods: Released in December 2016, priced at $159, the original AirPods were discontinued on March 20, 2019, when the second-generation model launched. They used Bluetooth 4.2 and Apple’s W1 wireless chip., which lacks support for Hey Siri. Beyond that, there are no functional differences between the first and second-generation AirPods. The original AirPods shipped with the wired (Lightning) charging case, but also work with the Qi wireless charging case, available separately.
- AirPods (2nd generation): Released on March 20, 2019, the second-generation AirPods swap the W1 chip for Apple’s newer H1 headphone chip. It brings features such as Bluetooth 5, hands-free Hey Siri, up to fifty percent more talk time, more reliable connections and faster devices switching. They’re available with the same wired (Lightning) charging case as the first generation, for $159, or with a charging case that supports both wired (Lightning) and wireless (Qi) charging, for $199.
- Wireless charging case: This case, available separately for $79, works with Qi-certified chargers or the Lightning connector. It’s compatible with both first and second-generation AirPods. The wireless case is distinguished from its wired counterpart by the charging indicator LED, located on its exterior. A quick fifteen-minute session in the case gives the second-generation AirPods three hours of listening time or two hours of talk time. The charging case provides more than 24 hours of listening time or 18 hours of talk time.
For more information on the AirPods family, visit apple.com/airpods.
Apple also offers a higher-end AirPods model, the AirPods Pro, which offers more advanced features including active noise cancellation and better sweat resistance in exchange for $249.
Apple-only features
Built-in sensors optimize audio and power smart features. For instance, your AirPods can detect taps, like double-tap to pause audio. Automatic in-ear placement detection lets the AirPods pause playback when you take them out of the ears. The sensors help recognize when you’re using a single AirPod. And they detect when you start speaking, engaging dual beam-forming microphones to focus on the sound of your voice. There are two microphones in each AirPod: one is at ear level, facing outward, and the other one is at the bottom of the stem.
→ Learn specific AirPods Pro controls
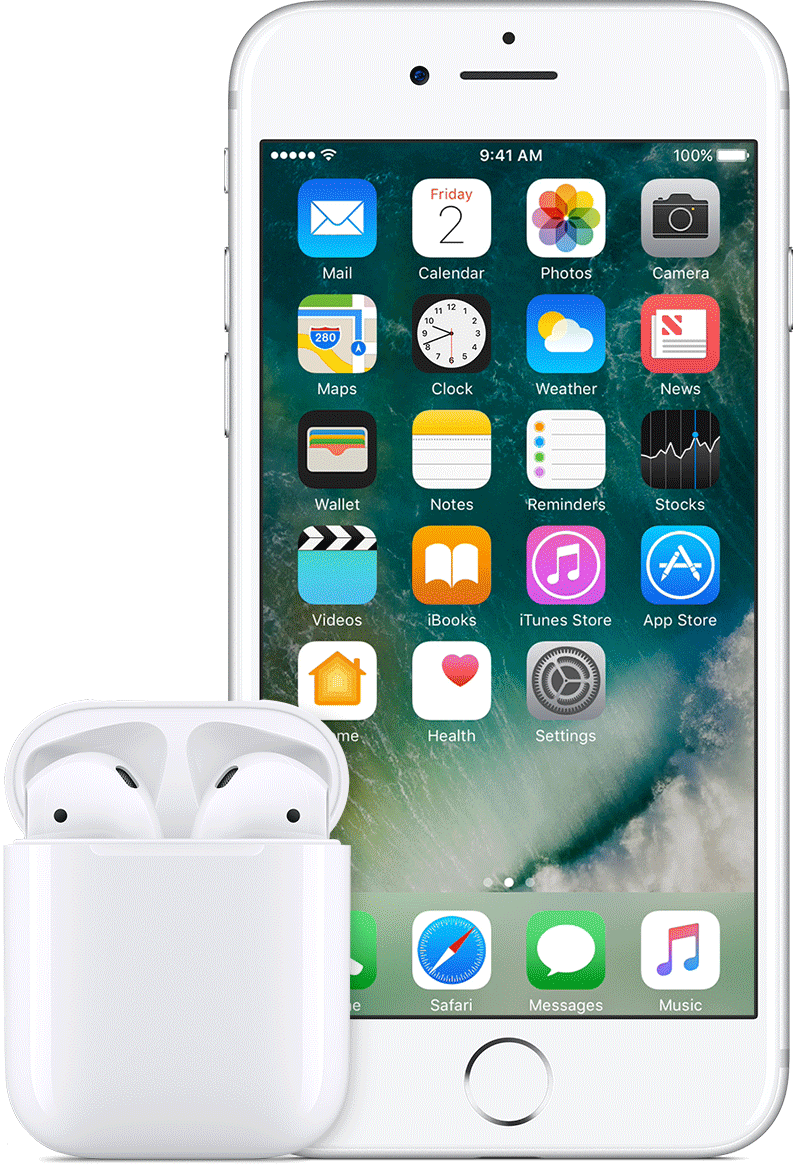
When you first set them up with an iPhone, iPad, iPod touch, Mac, Apple Watch or Apple TV, your AirPods are instantly available across all your other devices using the same Apple ID account. If your iPhone is running iOS 14.0 or later or your iPad is using the iPadOS 14.0 software or newer, you’ll also get a cool feature that automatically switches your AirPods between devices.

With automatic switching, your AirPods automatically switch from one device to another based on your needs. Imagine you’re listening to music on your iPhone before picking up your iPad to watch a TV show on it. Your AirPods will automagically switch to the new device without you having to do a thing. Similarly, start a call on your Mac and the earphones will switch again. Finally, if you get a call on your iPhone, the AirPods will switch again.
How cool is that?
System requirements
Advanced AirPods features are fully supported on iPhone, iPad and iPod touch models with iOS 10.2 or later, Apple Watch models with watchOS 3.0 or later and Mac models with macOS Sierra 10.12.0 or later. On non-Apple devices, AirPods behave like standard Bluetooth headphones.
→ How to share audio with two sets of AirPods
An iCloud account is required for one-tap setup across all your Apple devices. iCloud-based pairing is unavailable on Apple TV, older Mac models and non-Apple devices.
The following Apple device models are fully supported by AirPods:
iPhone smartphones
- iPhone 11
- iPhone 11 Pro
- iPhone 11 Pro Max
- iPhone XS
- iPhone XS Max
- iPhone XR
- iPhone X
- iPhone 8
- iPhone 8 Plus
- iPhone 7
- iPhone 7 Plus
- iPhone SE
- iPhone 6s
- iPhone 6s Plus
- iPhone 6
- iPhone 6 Plus
- iPhone 5s
If you have the first-generation AirPods, your iPhone must be running at least iOS 10. If your AirPods are the second-generation model, the phone must be powered by iOS 12.2 or later.
iPad tablets
- iPad Pro 12.9-inch (3rd generation)
- iPad Pro 12.9-inch (2nd generation)
- iPad Pro 12.9-inch (1st generation)
- iPad Pro 11-inch
- iPad Pro 10.5-inch
- iPad Pro 9.7-inch
- iPad (7th generation)
- iPad (6th generation)
- iPad (5th generation)
- iPad Air (3rd generation)
- iPad Air (2nd generation)
- iPad Air (1st generation)
- iPad mini (5th generation)
- iPad mini (4th generation)
- iPad mini (3rd generation)
- iPad mini (2nd generation)
If you have the first-generation AirPods, your iPad must be running at least iOS 10. If your AirPods are the second-generation model, the tablet must be powered by iOS 12.2 or later.
iPod touch media players
- iPod touch (7th generation)
- iPod touch (6th generation)
If you have the first-generation AirPods, your iPod touch must be running at least iOS 10. In the case of the second-generation AirPods, the media player must be using iOS 12.2 or later.
Apple Watch smartwatches
- Apple Watch Series 5
- Apple Watch Series 4
- Apple Watch Series 3
- Apple Watch Series 2
- Apple Watch Series 1
If you have the first-generation AirPods, your Apple Watch must be running at least watchOS 3.0. If your AirPods are the second-generation model, the watch must be using watchOS 5.2 or later.
Mac computers
- MacBook (Retina, 12-inch, Early 2015–2017)
- MacBook Air (11-inch, Mid 2012–Early 2015)
- MacBook Air (13-inch, Mid 2012–2017)
- MacBook Air (Retina, 13-inch, 2018–2019)
- MacBook Pro (Retina, 13-inch, Late 2012–Early 2015)
- MacBook Pro (Retina, 15-inch, Mid 2012–Mid 2015)
- MacBook Pro (13-inch, Mid 2012–2019)
- MacBook Pro (15-inch, Mid 2012–2019)
- iMac (21.5-inch, Late 2012–2017)
- iMac (27-inch, Late 2012–Late 2013)
- iMac (Retina 4K, 21.5-inch, Late 2015–2019)
- iMac (Retina 5K, 27-inch, Late 2014–2019)
- iMac Pro (2017)
- Mac mini (Late 2012–Late 2018)
- Mac Pro (Mid 2010–2019)
If you have the first-generation AirPods, your Mac must be running at least the macOS Sierra 10.12.0 software. If your AirPods are the second-generation model, then your computer must be using the macOS Mojave 10.14.4 update or later.
Apple TV media streamers
- Apple TV 4K
- Apple TV HD
If you have the first-generation AirPods, your Apple TV must be running at least tvOS 11.0. In the case of the second-generation AirPods, the media streamer must be on tvOS 12.2 or later.
Non-Apple devices
Your AirPods function as standard Bluetooth headphones when used with non-Apple devices like:
- Windows computers
- Android smartphones and tablets
- Set-top boxes
Your non-Apple device must have Bluetooth 4.0 or higher to connect to your AirPods.
AirPods feature availability
Some features may require iOS or iPadOS 13.0 or newer. In that case, those features won’t work on your iPhone 5s, iPhone 6, iPhone 6 Plus, iPod touch (6th generation), iPad Air (1st generation) and iPad mini (2nd and 3rd generation) as those devices are incompatible with iOS 13.
Audio sharing
The audio sharing feature is unsupported on the following devices:
- iPhone 7
- iPhone 7 Plus
- iPhone 6s
- iPhone 6s Plus
- iPhone 6
- iPhone 6 Plus
- iPhone 5s
- iPhone SE (1st generation)
- iPad Pro 12.9-inch (1st generation)
- iPad Pro 9.7-inch
- iPad Air (2nd generation)
- iPad Air (1st generation)
- iPad mini (4th generation)
- iPad mini (3rd generation)
- iPad mini (2nd generation)
- iPod touch (6th generation)
- Apple Watch Series 5
- Apple Watch Series 4
- Apple Watch Series 3
- Apple Watch Series 2
- Apple Watch Series 1
- Apple TV 4K
- Apple TV HD
Announce Messages with Siri
The “Announce Messages with Siri” feature allows Siri to dictate your incoming text messages and reply instantly, hands-free. This feature is supported by these audio products from Apple:
- AirPods (2nd generation)
- AirPods Pro
- Powerbeats
- Powerbeats Pro
- Beats Solo Pro
Your iPhone or iPad also must be running iOS 13.2 or iPadOS 13.2 or later.
How to pair AirPods with your devices
Thanks to the magic of Apple’s custom headphone chips, traditional Bluetooth pairing is a thing of the past. Your AirPods are ready to set up as soon as you open the case. Pairing information is synced via iCloud, letting you use the earbuds across all your devices.
→ How to enable mono audio on AirPods
Automatic pairing is unavailable on older Macs models powered by legacy Bluetooth chips that lack Handoff support. It’s also unsupported on non-Apple devices, like Windows PCs and Android smartphones. On those devices, you must pair your AirPods manually.
Pairing AirPods with your iPhone or iPad
Be sure that your iPhone is unlocked and Bluetooth is enabled in Settings → Bluetooth, then follow the steps below to use auto-pairing:
- With your iPhone unlocked and your AirPods in their charging case, open the lid and hold the case approximately two inches (six centimeters) away from the iPhone.
- Setup animation plays in a popup card on your handset. Tap “Connect” to pair your AirPods.
- With the phone connected to the earbuds, tap “Done” to dismiss the card.
If your iPhone is signed in to iCloud, pairing information is automatically pushed to all your other devices using the same iCloud account. This lets you use your earbuds across devices without having to disconnect and re-pair them manually.
Are your AirPods already paired with an iPhone, but you’d like to pair them with another device? If so, put both earbuds in their charging case and close the lid. Now bring the case near the other device and flip the lid open, then tap Connect and hold the button on the back of the charging case. Doing so will pair the AirPods to another iPhone.
Pairing AirPods with your Apple Watch
If you previously set up your AirPods using your iPhone, they’re already connected to your Apple Watch so there’s no need for additional pairing.
If you’d like to set up your AirPods using your Apple Watch, follow the steps below:
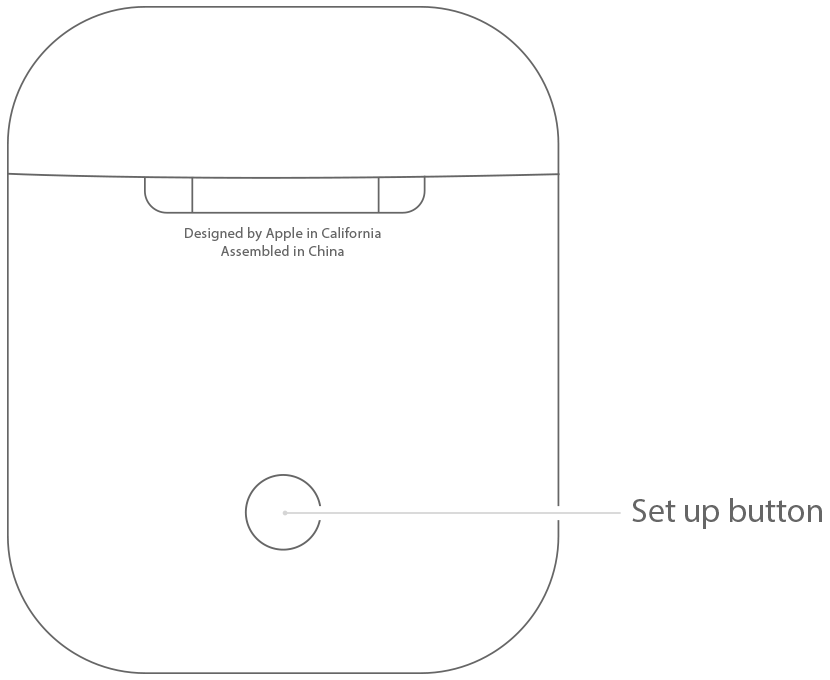
- Put your AirPods in their charging case and close the lid.
- Now open the lid, but don’t remove any AirPods yet.
- Press and hold the button on the case’s back until the status LED starts blinking white.
- On your watch, open the Settings app.
- In the Settings app, choose “Bluetooth” in the root list.
- Tap your AirPods when they appear on the list of nearby Bluetooth devices.
After device status changes from “Pairing” to “Paired,” your AirPods are ready to use.
Pairing AirPods with your Mac
You can also set up AirPods on your Mac computer. Pairing information will be automatically pushed via iCloud to your other devices using the same Apple ID. Because macOS does not support quick-connect cards like iOS, you’ll need to pair your AirPods manually to a Mac:
To pair your AirPods with your Mac, follow these steps:
- Put your AirPods in their charging case and close the lid.
- Now open the lid, but don’t remove any AirPods yet.
- Press and hold the button on the case’s back until the status LED starts blinking white.
- On your Mac, click the Apple menu and select the option “System Preferences.”
- Click the Bluetooth icon in the System Preferences window.
- When macOS detects your AirPods, click “Pair” next to their listed name.
You can now click either the Bluetooth or the Volume icon in the menu bar to make sure that your AirPods are selected as the output device.
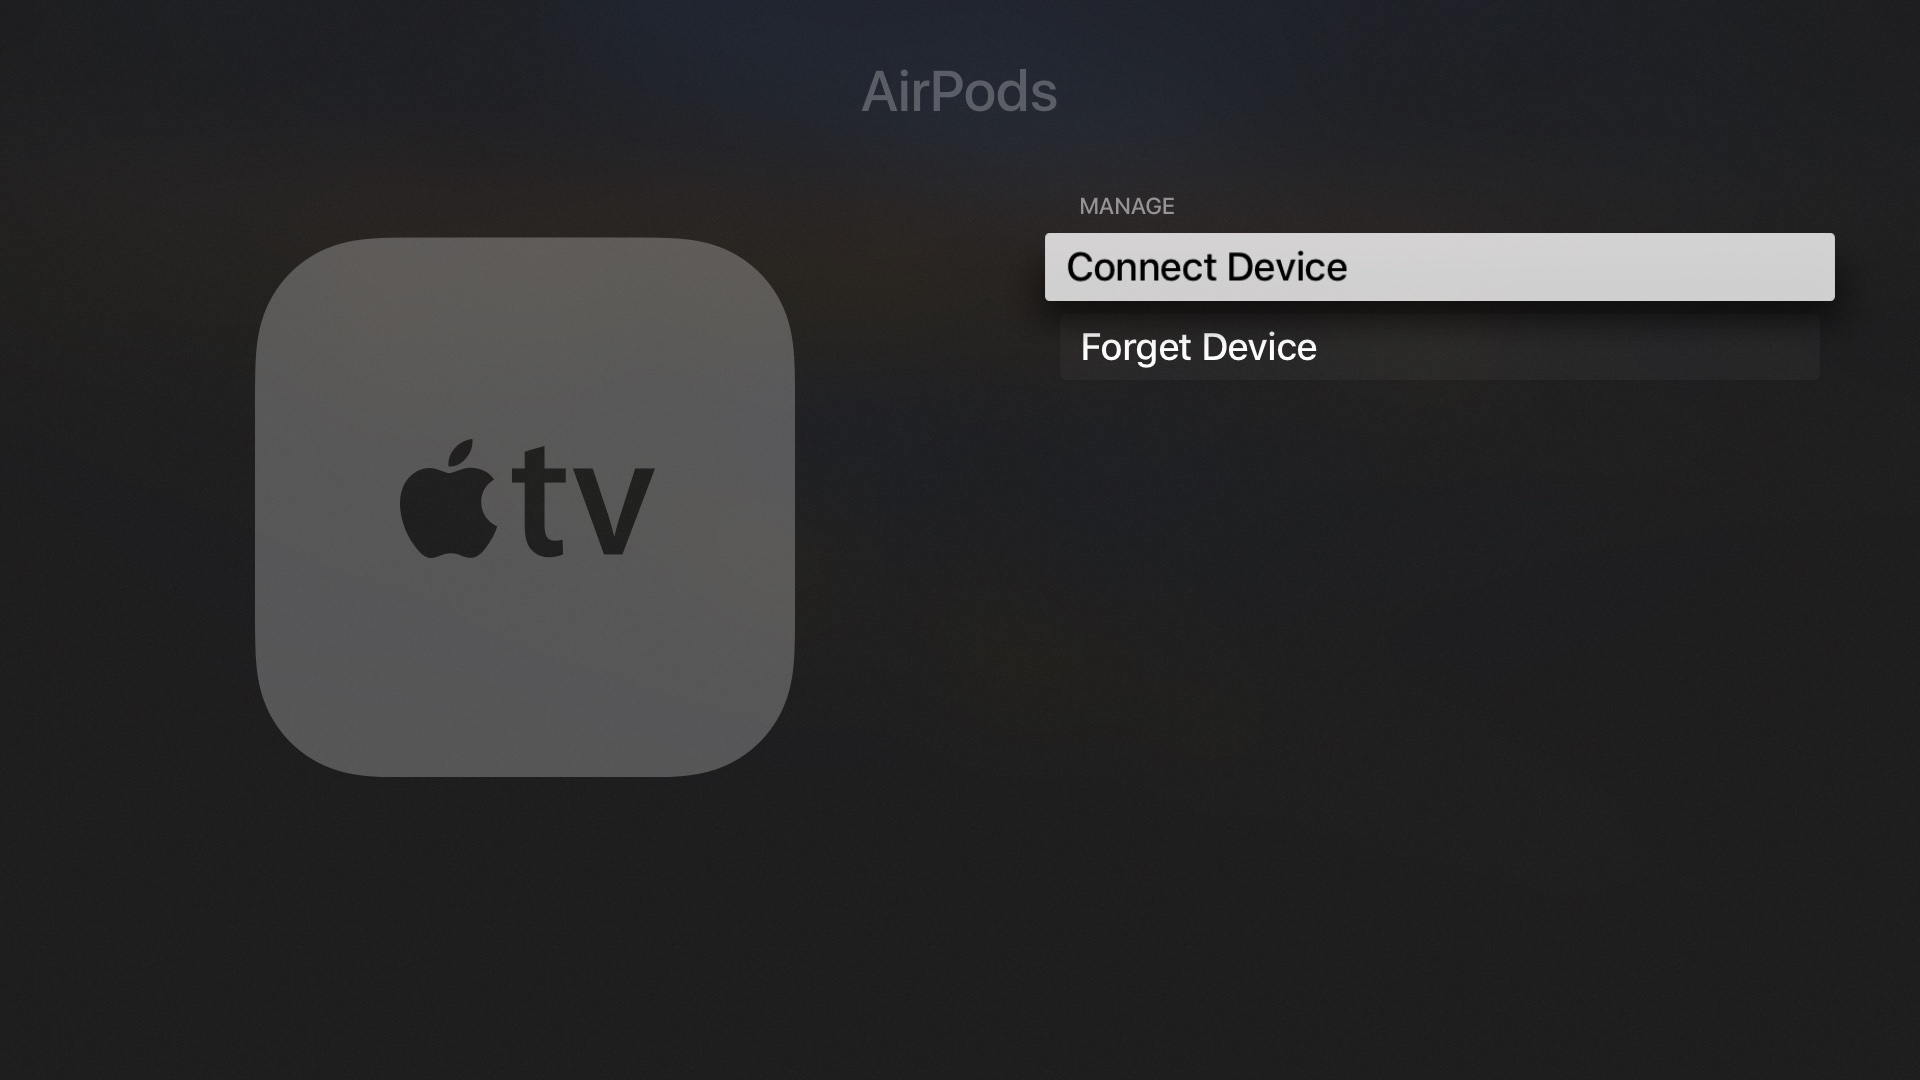
Pairing AirPods with your Apple TV
If you previously set up your AirPods using another device associated with the same Apple ID, you can start using them on your Apple TV without additional pairing.
To set up your AirPods using your Apple TV, follow the steps below:
- Put your AirPods in their charging case and close the lid.
- Now open the lid, but don’t remove any AirPods yet.
- Press and hold the button on the case’s back until the status LED starts blinking white.
- On your Apple TV, open the Settings app.
- Choose “Remotes & Devices” in the root list.
- Choose the option“Bluetooth.”
- Select your AirPods underneath the “Other Devices” heading.
When pairing completes, you can start using AirPods on your Apple TV.
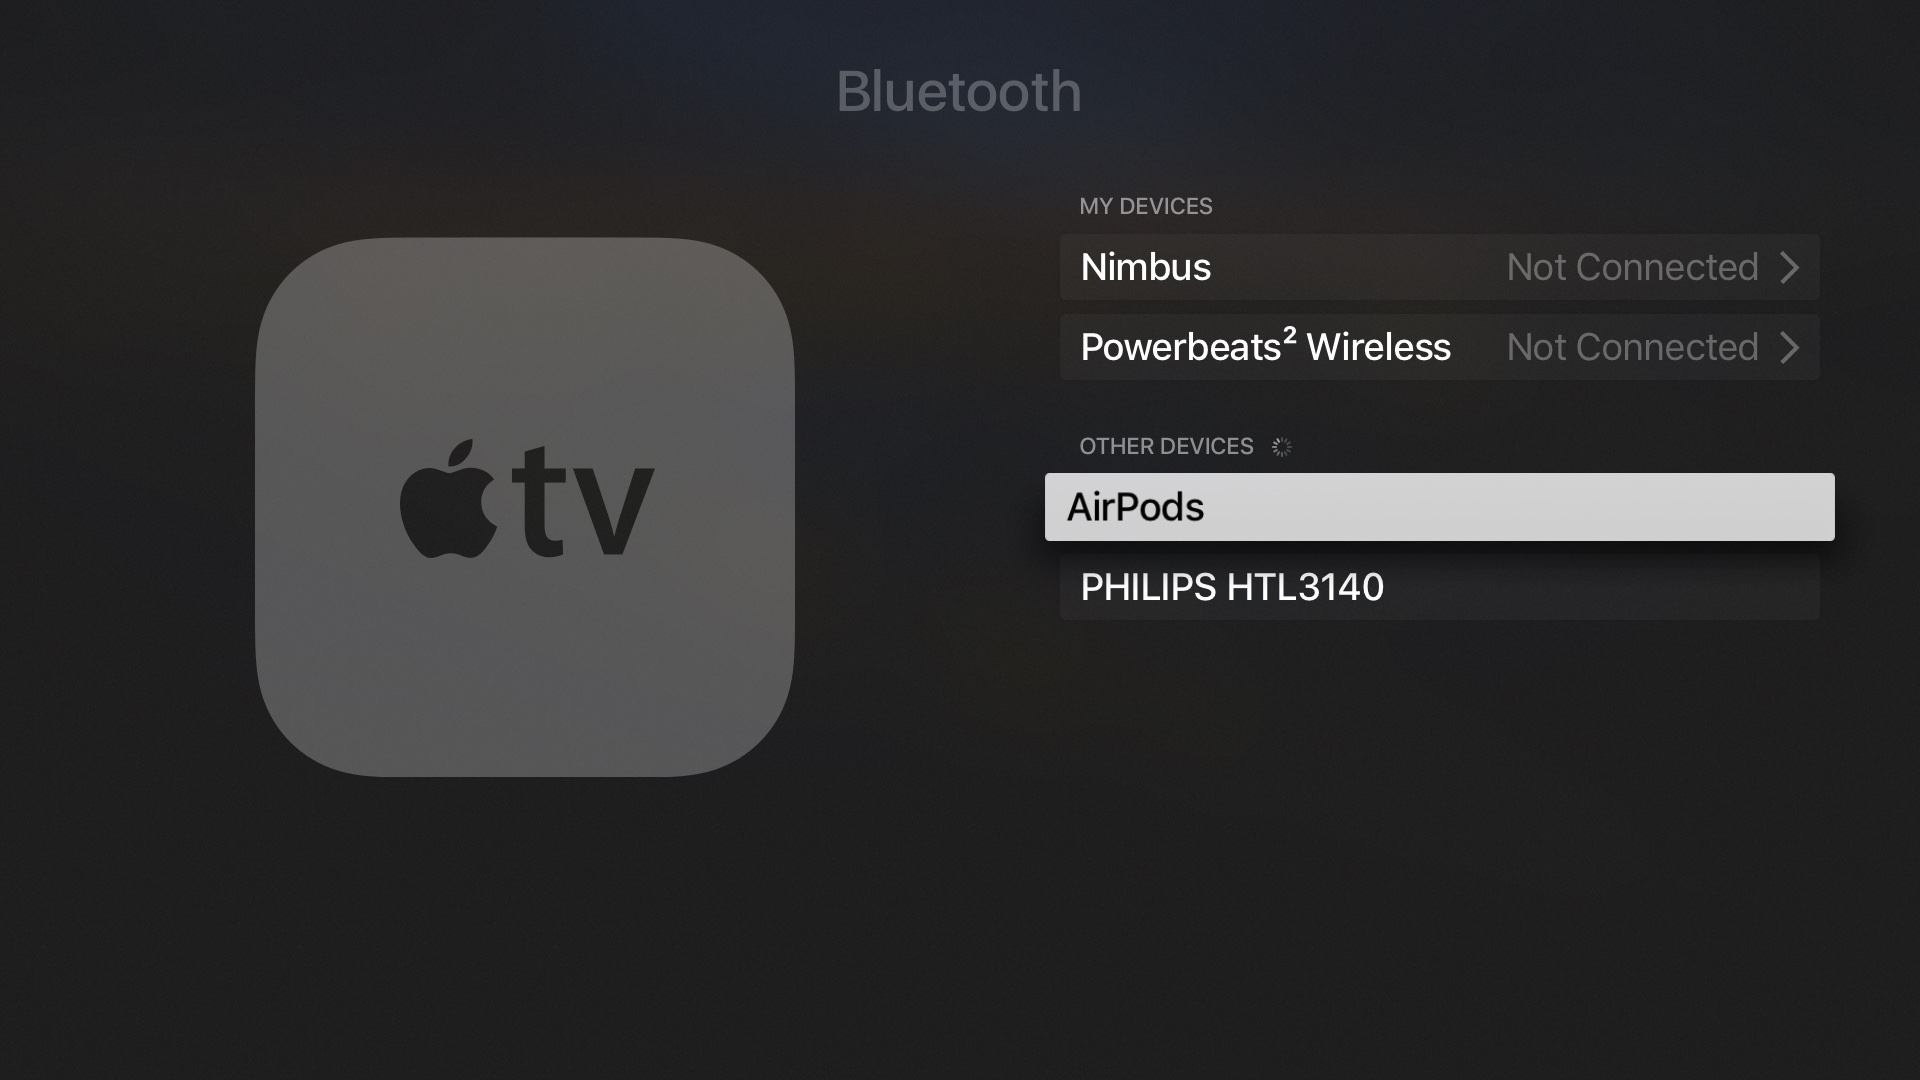
The Apple TV does not support effortless pairing via the quick-connect card like iOS does. But since the AirPods are also regular Bluetooth earphones, you can connect them manually to your Apple media player like you would any standard Bluetooth device, such as a keyboard.
Pairing AirPods with non-Apple devices
Follow these steps to use your AirPods with a non-Apple device like your Windows PC or an Android smartphone that supports Bluetooth 4.0 or higher.
- Put your AirPods in their charging case and close the lid.
- Now open the lid, but don’t remove any AirPods yet.
- Press and hold the button on the case’s back until the status LED starts blinking white.
- On your non-Apple device, use Bluetooth pairing to finish setting up your AirPods.
As mentioned, certain features are unavailable when using your AirPods with a non-Apple device.
For instance, you won’t be able to summon Siri or use hassle-free iCloud pairing. Basically, you can listen and talk when using your AirPods as a Bluetooth headset with a non-Apple device.
How to unpair AirPods from your devices
Unpairing your AirPods from one Apple device automatically removes them from all your other iCloud devices that are signed in to the same Apple ID account. However, they will remain paired with non-Apple devices that don’t support iCloud pairing until you manually unpaired them.
Unpairing AirPods using your iPhone or iPad
Follow these steps to unpair your AirPods from iCloud using your iOS device:
- Open the Settings app on your iPhone or iPad.
- Tap “Bluetooth” in the root list.
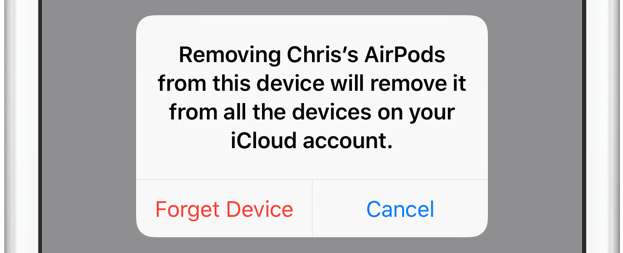
- Now Hit “i” next to your AirPods, then tap “Forget This Device.”
- Confirm the action by tapping “Forget This Device” in the popup menu.
The AirPods should unpair from all your iCloud devices using the same Apple ID account at once.
If you don’t see AirPods listed, be sure that Bluetooth is turned on.
Unpairing AirPods using your Apple Watch
Follow these steps to unpair your AirPods from iCloud using your Apple Watch smartwatch:
- Launch the Settings app on your Apple Watch.
- Tap “Bluetooth” in the root list.
- Tap “i” next to your AirPods.
- Tap “Forget Device” to complete the unpairing process.
Your AirPods will be unpaired from all iCloud devices signed in to the same Apple ID account.
Unpairing AirPods using your Mac
Follow these steps to unpair your AirPods from iCloud using your Mac computer:
- On your Mac, click the Apple menu and select the option “System Preferences.”
- Click the Bluetooth icon in the System Preferences window.
- Click the “X” next to the AirPods or right-click them and choose “Remove” from the menu.
- Confirm the action by clicking “Remove.”
Alternatively, hold down the Option (⌥) key on your Mac keyboard while clicking the Bluetooth icon in the macOS menu bar, then select your AirPods and choose “Remove” from the menu.
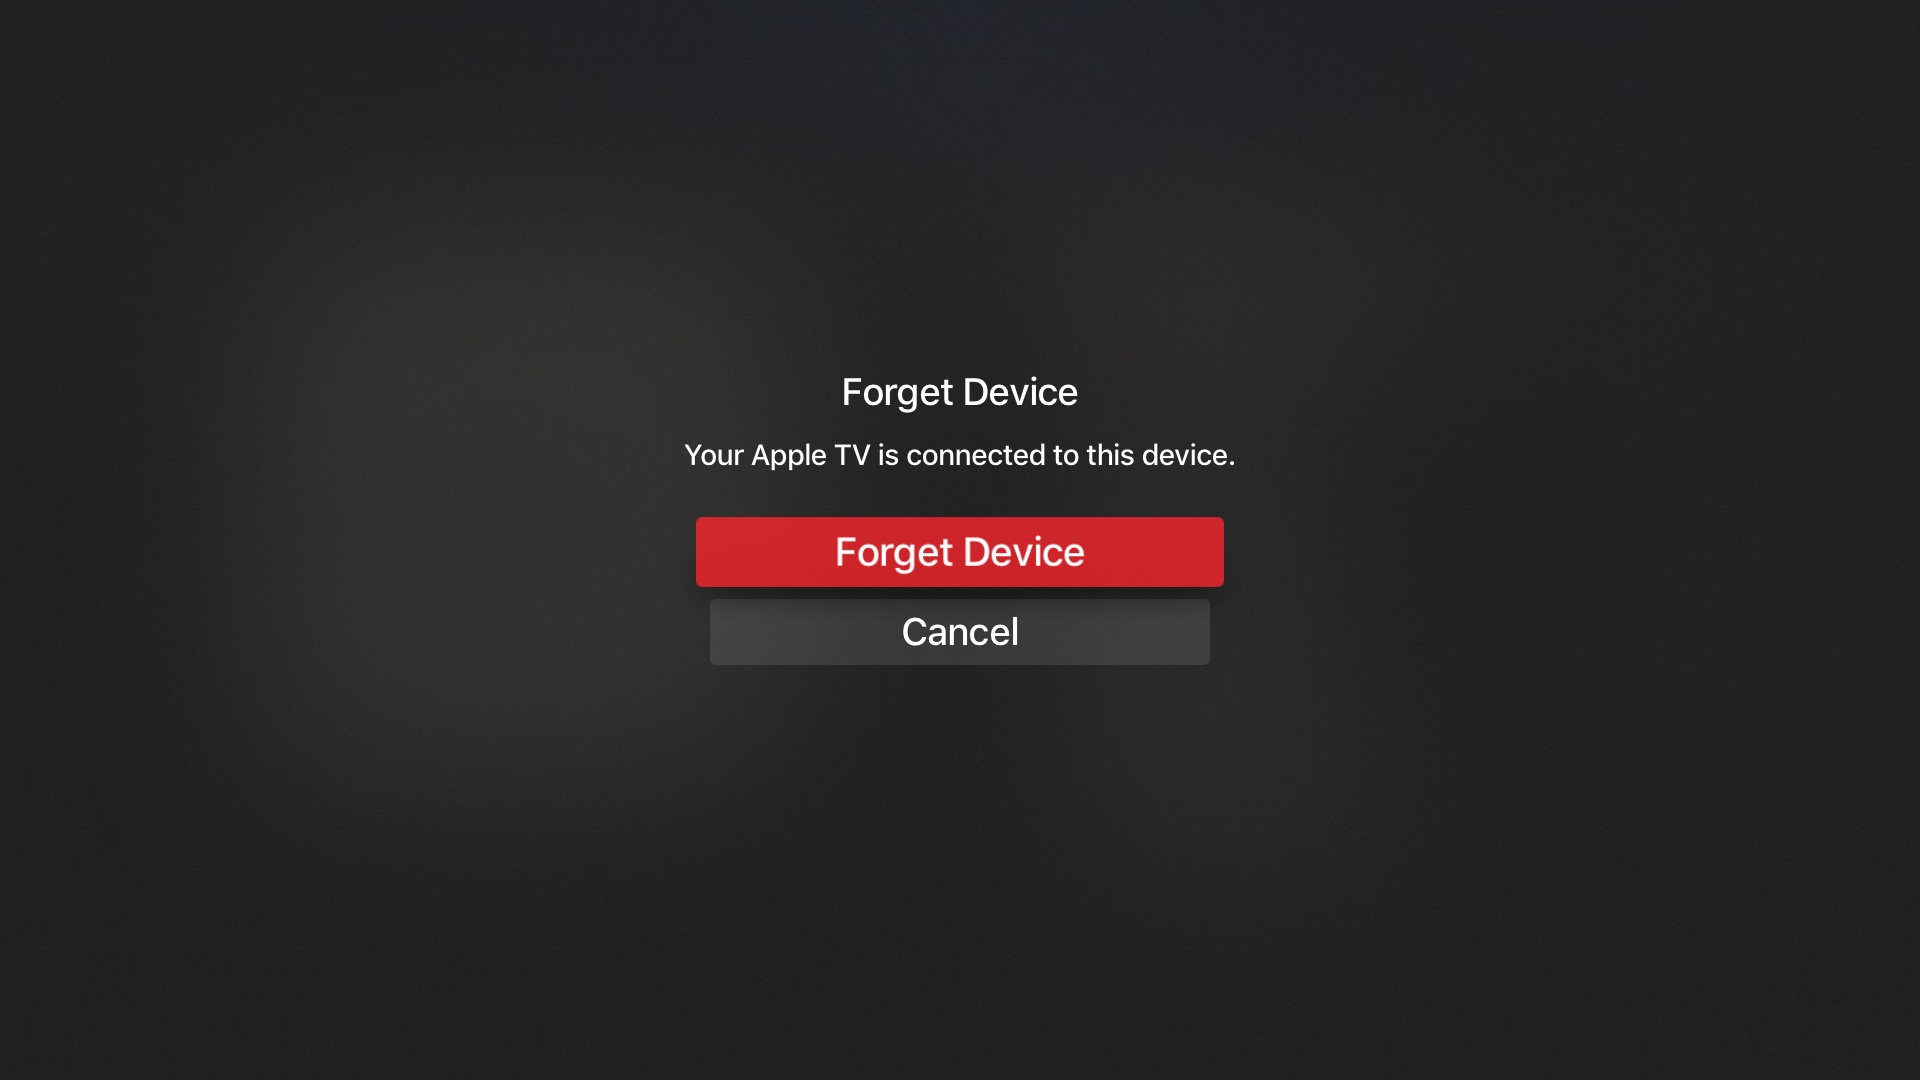
Unpairing AirPods using your Apple TV
Follow these steps to unpair your AirPods from iCloud using your Apple TV media streamer:
- Open the Settings app on your Apple TV.
- Choose “Remotes & Devices” from the root list.
- Select the option “Bluetooth.”
- Click your listed AirPods, then select “Forget Device.”
- Confirm the operation by choosing “Forget Device” from the prompt.
Your AirPods will be unpaired from all iCloud devices signed in to the same Apple ID account.
Unpairing AirPods using non-Apple devices
Please note that unpairing your AirPods from an Apple device doesn’t automatically remove pairing on non-Apple devices which cannot access iCloud pairing information. As we mentioned, the AirPods work like an ordinary Bluetooth accessory on non-Apple hardware.
In other words, they follow the same unpairing process as your Bluetooth keyboards or mouse. Read the manual that came with your non-Apple device for specific unpairing steps.
How to check AirPods batteries
Check the status of juice in AirPods and their charging case in four ways:
- Charging case: The case’s status light indicates the status of your AirPods batteries.
- Batteries widget: Precise battery readouts for all your connected Bluetooth devices.
- macOS Volume menu: View the AirPods and charging case power levels on your Mac.
- Siri: Siri can tell you the status of your AirPods batteries.
- Apple Watch: Get the current AirPods charge levels on your wrist.
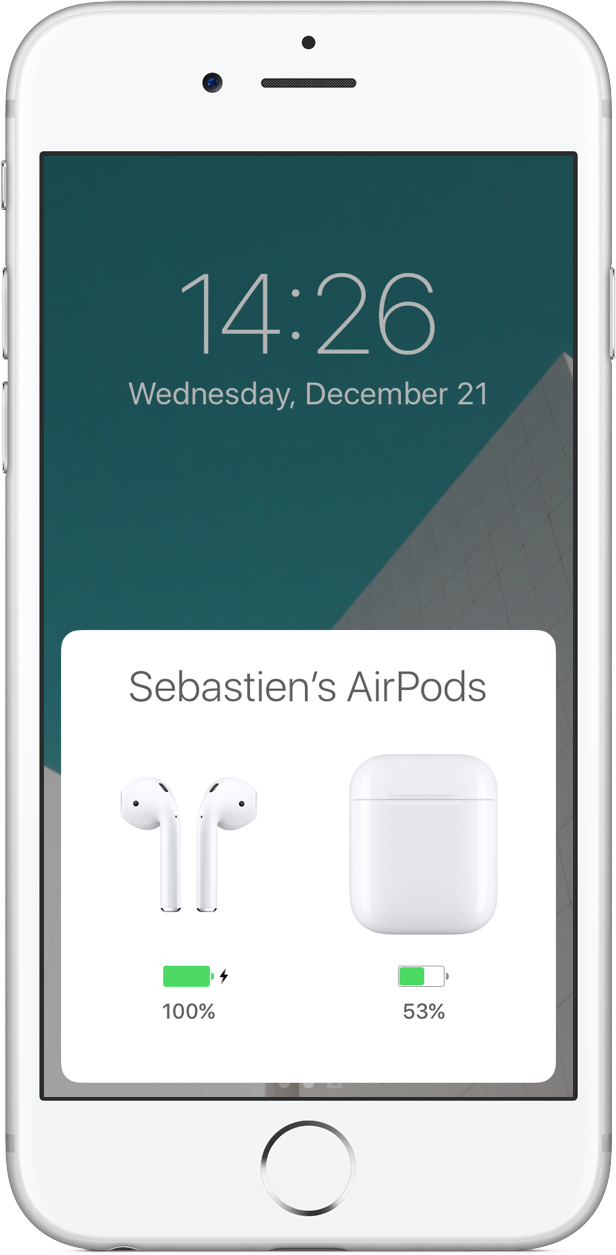
Checking AirPods charge with the charging case
If your AirPods are in the case, open the lid and hold the case close to your iPhone. A card pops up, displaying the power levels of both your AirPods and their charging case.
Checking AirPods charge with the Batteries widget
You can use Apple’s iOS Batteries widget to check the current juice for Bluetooth accessories. If the widget isn’t enabled by default, follow these steps to add it to your Today view.
- Go to the first Home screen on your iPhone or iPad.
- Swipe right to enter your Today view with widgets.
- Scroll all the way to the bottom, then tap “Edit.”
- Tap “+” next to “Batteries” to add the widget to your Today center.
- Lastly, Tap “Done” to finish making changes.
You can now check the power levels of any connected Bluetooth devices with the widget.
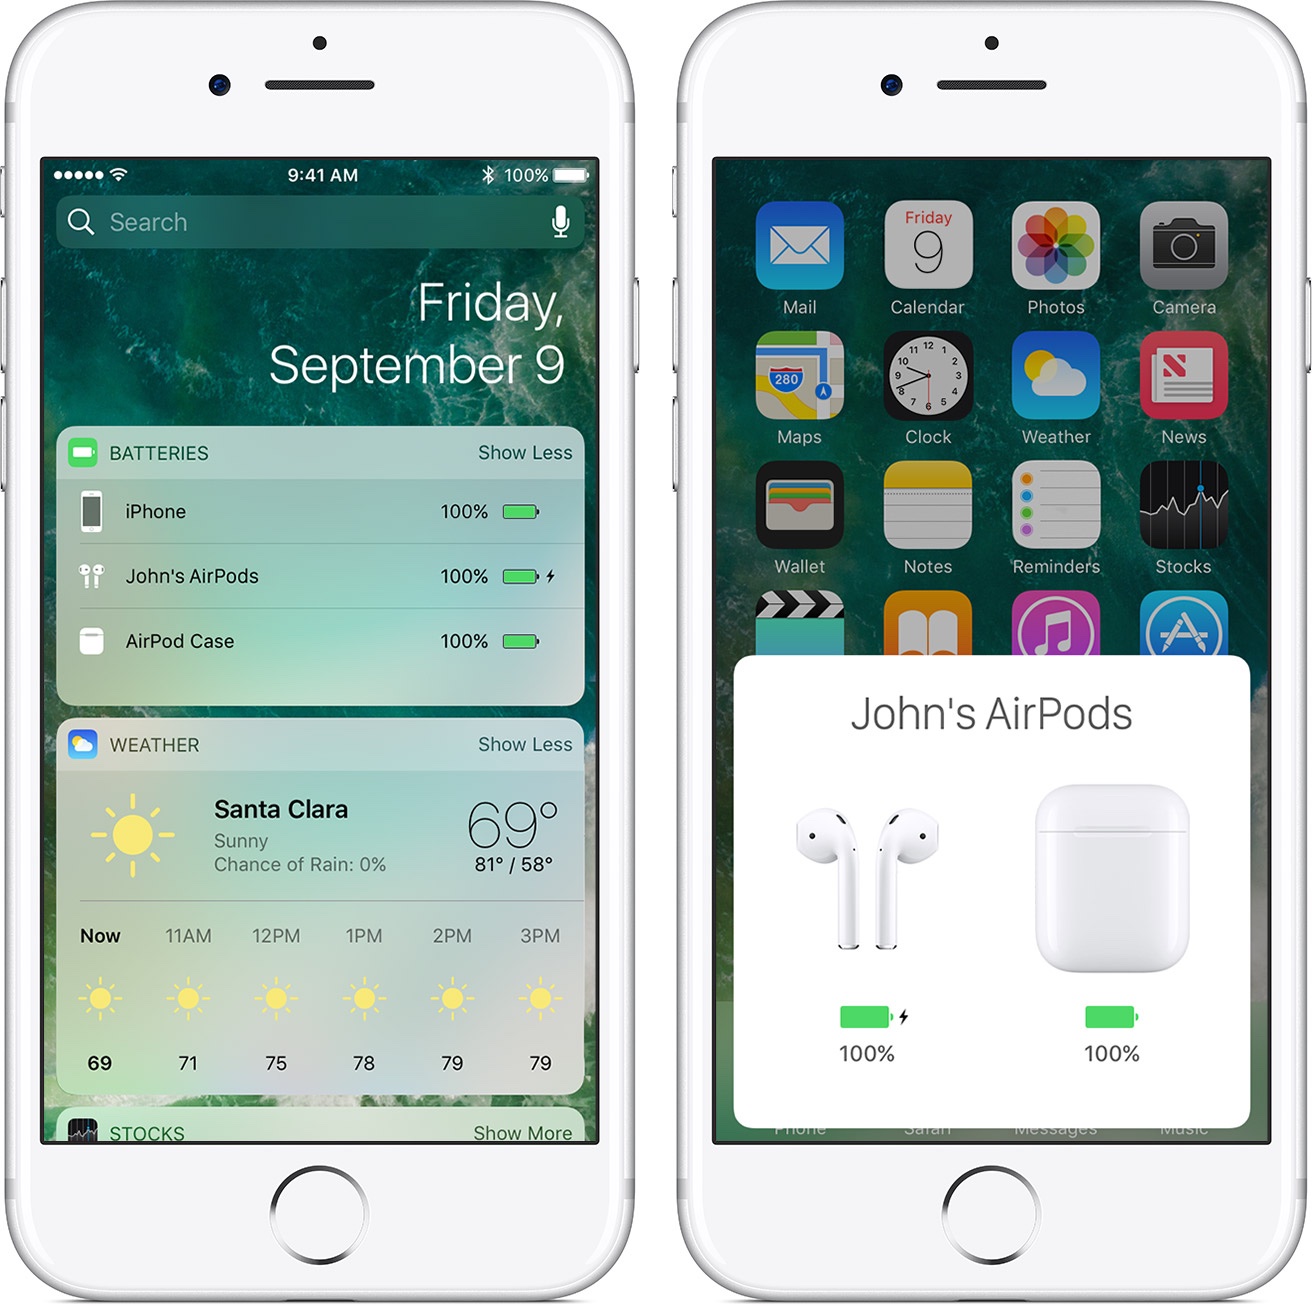
Just swipe right on the Lock screen, the first Home screen or within the Notification Center to get to your widgets. On iOS 14, you can add the Batteries widget to the Home screen for an at-a-glance overview of the AirPods batteries and the charging case battery.
The Batteries widget shows you the charge status of each AirPod. The current power level of the charging case’s internal battery only appears when at least one AirPod is in the case.
Checking AirPods charge with Mac volume control
Follow these steps to check the charge status of your AirPods on your Mac computer:
- Open the lid or take the AirPods out of their charging case.
- Click the Bluetooth icon in the macOS menu bar.
- Hover the pointer over your AirPods listed in the menu.
After a brief moment or two, you’ll see the current power levels for both your AirPods and their charging case displayed in the Bluetooth menu. Can’t find the Bluetooth menu bar icon in the upper-right of your Mac display? Add it to the menu bar by ticking the box next to “Show Bluetooth in the menu bar” in System Preferences → Bluetooth.
Checking AirPods charge with Siri
You can ask your Apple assistant about juice levels for your AirPods with queries like:
- “How’s the battery on my AirPods?”
- “Check my AirPods battery”
Siri will tell you the current power levels for both the charging case and each AirPod.
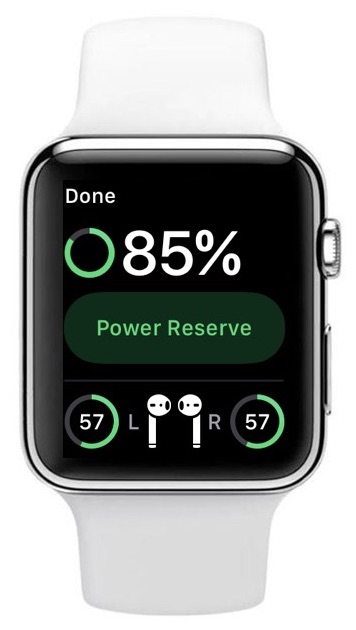
Checking AirPods charge with your Apple Watch
If you have an Apple Watch, swipe up on your watch face to access the Control Center, then tap the battery icon to get the current power leaves for each AirPod and the case.
How to charge the AirPods and their case
Apple rates the second-generation AirPods as providing five hours of listening time or two hours of talk time on a single charge. Their run time can be extended to up to 24 hours of listening time or up to eighteen hours of talk time via the included charging case that holds multiple charges.
How to charge your AirPods
To top up your AirPods, simply put them in theIr charging case and close the lid.
A 15-minutes charge in the case gives you AirPods about three hours listening time or approximately two hours of talk time. Your mileage may vary — these are official Apple figures listed in the technical specification for the original AirPods and the second-generation model.
How to charge the charging case
To charge the charging case itself, plug the included Lightning to USB cable into the Lightning connector on the case, then connect the other end of the cable into any USB-powered device, including your iPhone’s five-watt power adapter.
→ How to adjust AirPods Pro active noise cancellation and Transparency mode
To accelerate charging, connect the case to the twelve-watt USB power adapter that came with your iPad. You can charge the case with or without your AirPods inside. If the case is plugged while AirPods are inside, both the case and your AirPods will charge simultaneously.
Deciphering indicator light states on the charging case
The status indicator LED on the charging case denotes the charge status of your AirPods (when they’re in the case) or the case itself (when the AirPods are not in the case). On the regular charging case, the status light sits between the spaces for your AirPods. This requires you to open the case for a quick glance at the power status. Thankfully, Apple has fixed that with the wireless charging case by repositioning the status light indicator to the front of the case.
Here’s how to interpret the status light:
- Green: Fully charged
- Orange: Not fully charged
- Amber: Less than one full charge remains
- Flashing white: The AirPods are ready to pair with a Bluetooth host
How to use the AirPods
Each AirPod has “L” or “R” printed on it to denote its orientation. Place the left AirPod in your left ear and the right AirPod in your right ear. The optical sensor recognizes when they’re in the ear so you can start using them right away. You will hear a tone when your AirPods are connected.
→ How to update your AirPods software
Taking one or both AirPods out of your ear automatically pauses playback. If you happen to use just one AirPod, Apple’s custom chip automatically switches to a mono mixdown. This allows you to hear both sides of any stereo audio with just one AirPod.
Summoning Siri with your AirPods
To invoke your trusted digital personal assistant, double-tap above the stem of any AirPod (1st generation) or simply say aloud your request preceded by the hot word “Hey Siri” (2nd generation). You may need to pull your iPhone out of the pocket if your request is too complex. For example, long Wikipedia queries and image searches will require visual interaction with Siri.
The AirPods lack physical buttons, but you can adjust the volume, skip songs and more using Siri.
Common Siri commands for playback control
Here are a few useful Siri commands for controlling media playback:
- “Hey Siri, play something I like”
- “Hey Siri, pause”
- “Hey Siri, play [SONG_TITLE]”
- “Hey Siri, play [PODCAST_NAME]”
- “Hey Siri, listen to my Favorites playlist”
- “Skip back”
- “Skip forward”
- “Play the next song”
- “Skip back x seconds/minutes/hours”
- “Skip forward x seconds/minutes/hours”
- “Lower volume x percent”
- “Raise volume x percent”
- “Set the volume to x percent”
Complex Siri queries like nearby restaurants will require tapping around search results.
Making and answering calls with your AirPods
You can use your AirPods to make outgoing and answer incoming cellular calls, FaceTime calls and third-party VoIP calls using apps like Skype or Facebook Messenger.
How to answer calls with your AirPods
To answer an incoming call, double-tap (1st generation) or tap (2nd generation) either of your AirPods. Hit the same area during the call to hang up or switch to another incoming call.
- AirPods (1st generation): Double-tap either of your AirPods.
- AirPods (2nd generation): Tap either of your AirPods.
Do the same to hang up or switch calls.
How to make calls with your AirPods
To place an outgoing call hands-free, just ask Siri to call one of your contacts. For instance, you could utter the hot phrase “Hey Siri” (1st generation AirPods) or double-tap either of your AirPod to summon the assistant, then say something along the lines of “Call Sebastien’s mobile” or “Make a FaceTime call to the boss” or “Call Dad on speakerphone” or some such.
- AirPods (1st generation): Double-tap an AirPod, wait for a chime and make a request.
- AirPods (2nd generation): Say “Hey Siri,” followed by your request.
As explained later in this tutorial, You can configure your AirPods (2nd generation) to summon Siri when you double-tap one of the earbudS. Also, you can configure a double-tap action on your AirPods (1st generation) to something else than the default Siri action.
How to have Siri announce the caller
Follow these steps if you’d like to have Siri announce who’s calling via your AirPods:
- Open the Settings app on your iPhone.
- Tap “Phone“ or “FaceTime“ in the root list.
- Tap the option “Announce Calls.”
- Now choose between the following options:
- Always: Your iPhone will always announce incoming calls.
- Headphones & Car: Incoming calls are announced when using the AirPods or CarPlay.
- Headphones Only: Announce calls when a Bluetooth device like the AirPods is connected.
For detailed instructions on setting up this feature, peruse our dedicated tutorial on how to configure the Siri assistant on your iPhone or iPad to announce who’s calling.
Switching your AirPods between multiple devices
Thanks to iCloud pairing, your AirPods are automatically available across all your iPhone, iPad, iPod touch, Apple Watch, Mac and Apple TV devices that use the same Apple ID account. As a result, you don’t need to disconnect them manually when changing from one device to another like you would with manual Bluetooth pairing.
To switch to your AirPods, simply select them on your device:
- iPhone or iPad: Select your AirPods in the Control Center.
- Apple Watch: Select your AirPods in the Control Center.
- Mac: Choose your Airpods by clicking the volume icon in the macOS menu bar.
- Apple TV: Hold the remote’s Playbutton on the Home screen to choose your AirPods.
On older Macs and non-Apple hardware such as Windows PCs and Android devices, you must connect your AirPods using the last-century manual Bluetooth pairing method.
Switching to the AirPods on your iPhone or iPad
Follow these steps to switch to your AirPods on your iPhone, iPad or iPod touch:
- Open the Control Center on your iOS device.
- Tap and hold the AirPlay icon in the audio card’s upper-right corner.
- Choose your AirPods from the list of available devices.
You can also switch to the AirPods by tapping them in Settings → Bluetooth on your iOS device.

The audio output options may be available within some apps, like Music. If your AirPods move our of the Bluetooth range (33 feet or ten meters), audio output automatically returns to your iPhone.
Switching to the AirPods on your Apple Watch
Follow these steps to switch to your AirPods on your Apple Watch:
- Open the Control Center on your Apple Watch.
- Tap the AirPlay icon.
- Choose your AirPods from the list.
You can also switch to your AirPods by going to Settings → Bluetooth on the watch.
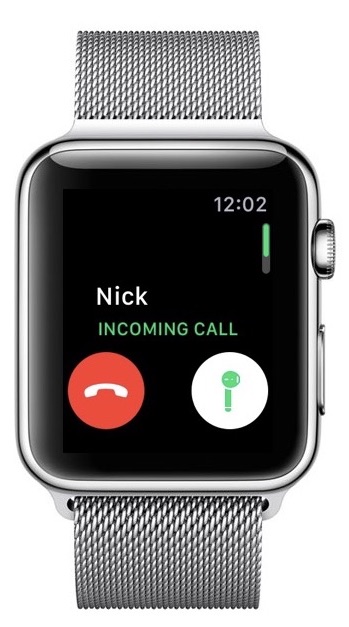
The AirPods calling experience on the Apple Watch comes with an added twist.
Specifically, when someone calls you there’s a bespoke AirPods button in place of the usual green Answer button on the watch. This is a nice touch that shows you the call will be routed to your AirPods rather than the Apple Watch speaker.
Switching to the AirPods on your Mac
Follow these steps to switch to your AirPods on your Mac:
- Click the Volume control in the macOS menu bar.
- Select your AirPods under “Output Device.”
Alternatively, you can switch to your AirPods in System Preferences → Bluetooth.
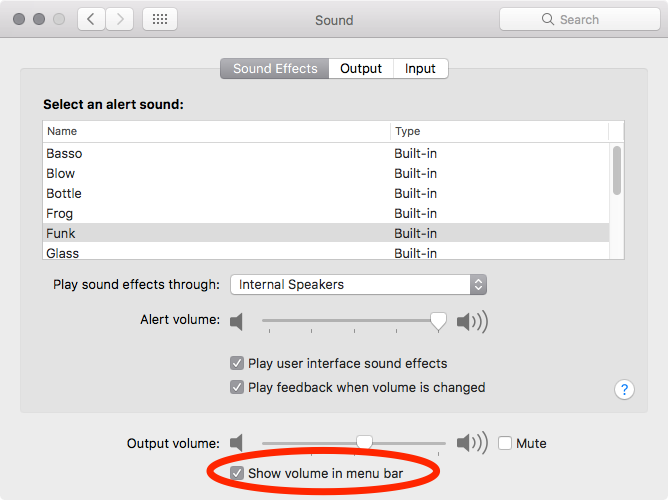
Certain Mac apps, such as iTunes, Music and others, may provide their own controls for selecting the desired output device. Don’t see the Volume icon in the menu bar? If so, go to System Preferences → Sound and tick the box next to “Show volume in menu bar.”
If your Mac is an older model that lacks a modern Bluetooth chipset that supports Handoff, you will need to switch to your AirPods manually. First, go to System Preferences → Bluetooth, then right click your listed AirPods and choose “Connect” from the popup menu. With your AirPods connected, you can now switch to them from the Volume menu bar item.
Switching to the AirPods on your Apple TV
Any AirPods that are linked to your Apple ID are instantly available on your Apple TV. Follow these steps to switch to your AirPods on your Apple TV:
- Press the Home button on the Siri Remote to get to the Home screen of your Apple TV.
- Select your AirPods in the list, then click the remote to activate them.
Your Apple TV will now play audio through your AirPods.
You can also switch to your AirPods in Settings → Audio & Video → Audio Output in tvOS.
How to adjust the AirPods settings to your liking
Some AirPods features can be customized to your liking. For instance, you can rename the AirPods or change the default double-tap action. Similarly, you can enable or disable automatic ear detection, change the active microphone and more.
Renaming your AirPods
By default, Apple uses your first name to name your AirPods (i.e. “Christian’s AirPods”). If you don’t like this naming scheme and would rather set a custom name for your AirPods, you can do so by following these steps:
- Put your AirPods in the ear to activate them.
- Connect to your AirPods via the Control Center’s Music card on your iOS device.
- Now open the Settings app on your iOS device.
- Tap “Bluetooth” in the root list.
- Tap “i” next to your listed AirPods.
- Choose the “Name” option.
- Type a new name for your AirPods.
- Swipe back to the previous screen to save any changes.
You cannot rename AirPods unless they’re paired with your device.
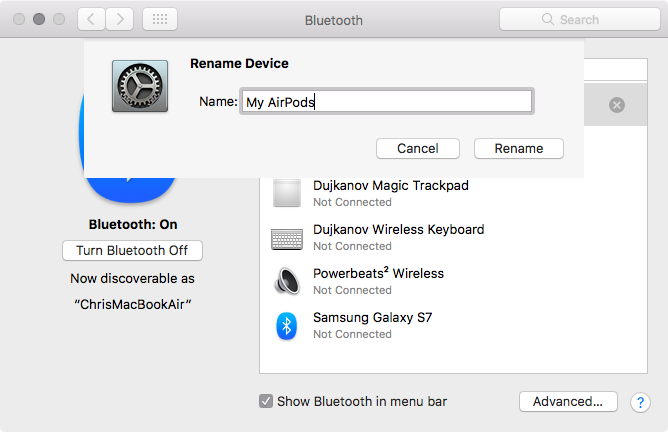
To rename the AirPods on your Mac, go to System Preferences → Bluetooth and right-click your connected earbuds, then choose “Rename” from the popup menu.
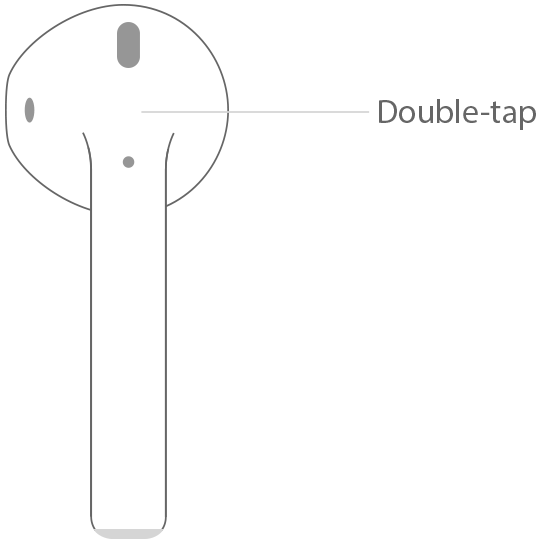
Adjusting the double-tap action
Built-in motion accelerometers sense when you double-tap an AirPod. Each AirPod can have a different double-tap action. By default, double-tapping either AirPod summons Siri or answers an incoming call. You can rebind this gesture to other actions. For instance, you may want to play, skip forward or go to the previous track upon double-tapping above the stem of either earbud.
Follow these steps to change what double-tapping each AirPod does:
- Put your AirPods in the ear to activate them.
- Connect to your AirPods via the Control Center’s Music card on your iOS device.
- Now open the Settings app on your iOS device.
- Tap “Bluetooth” in the root list.
- Tap “i” next to your listed AirPods.
- Tap “Left” or “Right” below the heading “Double-tap on AirPod”.
- Assign one of the following actions to the selected AirPod:
- Siri: This is the default Siri shortcut.
- Play/Pause: Double-tapping plays or pauses audio.
- Next Track: Skip to the next song.
- Previous Track: Listen to the previous song.
- Off: Nothing happens when you double-tap either AirPod.
As mentioned, each AirPod can be assigned its own double-tap action.
On non-Apple devices, this gesture invokes a Play/Pause command and cannot be changed.
Disabling automatic ear detection
Optical sensors inform the system when an AirPod is in your ear, automatically connecting to it. Conversely, the AirPods stop media playback as soon as you take them out of your ears.
Follow these steps to disable automatic ear detection on your AirPods:
- Put your AirPods in the ear to activate them.
- Connect to your AirPods via the Control Center’s Music card on your iOS device.
- Now open the Settings app on your iOS device.
- Tap “Bluetooth” in the root list.
- Tap “i” next to your listed AirPods.
- Slide the switch next to “Automatic Ear Detection” to the OFF position.
You’re wholeheartedly encouraged to leave this feature turned on.
With it enabled, audio stops playing when you’re not wearing your AirPods. This helps conserve battery life in case you forget to put the earbuds in their charging case. If you toggle off this setting, audio continues playing through the earbuds whether or not you’re wearing them.
→ Can’t rename your AirPods as “AirPods”? We have a fix.
“Automatic ear detection automatically transfers the audio route from connected devices to the AirPods when they are placed in your ears,” reads the feature’s description.
Selecting which AirPods microphones are used
Motion accelerometers automatically engage dual beam-forming microphones to focus on your voice. Follow these steps if you’d rather tell your AirPods which microphones to use:
- Put your AirPods in the ear to activate them.
- Connect to your AirPods via the Control Center’s Music card on your iOS device.
- Now open the Settings app on your iOS device.
- Tap “Bluetooth” in the root list.
- Tap “i” next to your listed AirPods.
- Select the“Microphone” option, then choose your desired setting:
- Automatically Switch AirPods: The active mic automatically changes from left to right.
- Always Left AirPod: The active AirPod microphone is fixed to the left AirPod.
- Always Right AirPod: The active AirPod microphone is fixed to the right AirPod.
You’re recommended to use the automatic option as doing so will the earbuds automatically switch to the microphone that’s getting the best input. Using either left or right earbuds as the active microphone only makes sense if you tend to be using only one AirPod for making calls.
What about EarPods or AirPods Pro?
Don’t own the AirPods or don’t care about them at all? If so, then be sure to check out our detailed guide which covers using Apple’s wired EarPods earphones. If you’re a fan of the premium AirPods Pro, here are some tips for how to use your AirPods Pro like a pro.
Subscribe to iDownloadBlog on YouTube
Need help? Ask iDB!
If you like this tutorial, pass it along to your friends and leave a comment below.
Got stuck? Not sure how to do certain things on your Apple device? Let us know via help@idownloadblog.com and a future tutorial might provide a solution.
Submit your own how-to suggestions via tips@idownloadblog.com.