The right light can make a single photo stop you in your tracks. Imagine a warm, natural glow that makes everyone and everything look their best. That’s the magic of golden hour photography.

What is Golden Hour Photography?
The golden hour starts roughly one hour after sunrise and one hour before sunset. If you want a more exact time for when the golden hour starts, you can use a golden hour calculator app like The Photographer’s Ephemeris. Or try other apps like Helios Golden Hour (for iOS) and Blue Hour Calculator (for Android).
You can also use an online golden hour calculator like this one to find out when the golden hours start at a specific location.
The golden hour’s soft, warm, directional light makes it easier to shoot than the harsh light of a midday sun. Both professional photographers and beginners prefer to shoot during the golden hours since it’s easier to work with.
Golden hour gets its characteristic look since the sun is in a lower position in the sky. Compared to other times of day, golden hour light is:
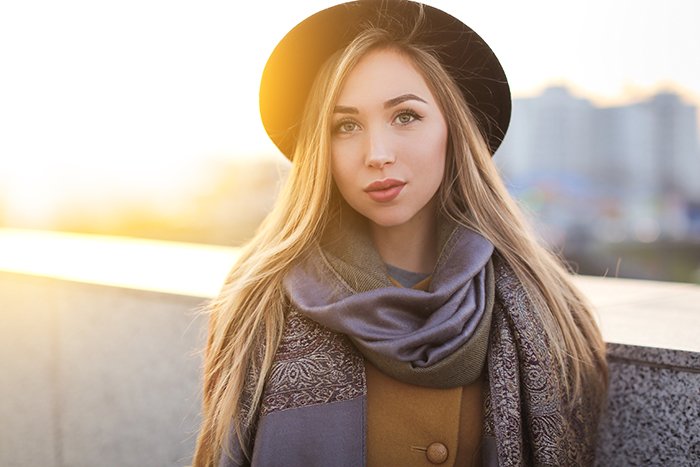
- Soft: the transition from light to dark is gradual, creating soft light that’s universally flattering and particularly good for portraits.
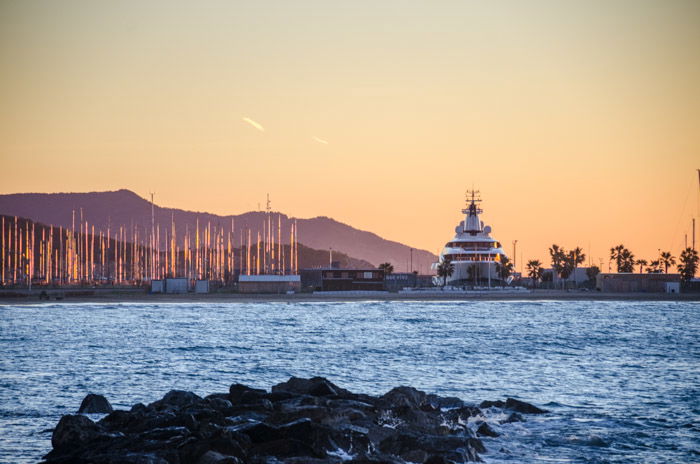
- Warm: the low angle of the sun creates an orange glow, associated with calm and happiness.
- Directional: since the sun is low in the sky, it’s easy to create back-lighting, side lighting or front lighting with just the sun and an inexpensive reflector or a modified fill flash.
Together, those three characteristics form the magic of the golden hour. All you have to do to take advantage of the golden hours is adjust your shooting time. And perhaps wake up a little earlier!
Our Top Tips for Shooting During Golden Hour
13. Get the Timing Right
Golden hour is one of the easiest types of natural light to work with, but it can still go wrong. You can run out of time and have to shoot high ISOs as the light wanes, or take portraits where the subject is squinting.
To avoid rushing, plan on arriving at least an hour before sunset, depending on the . If the weather is cloudy, give yourself even more time. Overcast days don’t provide quite the same magic, but the type of light is still soft and directional.
12. Position the Shot to Make the Most of Golden Hour
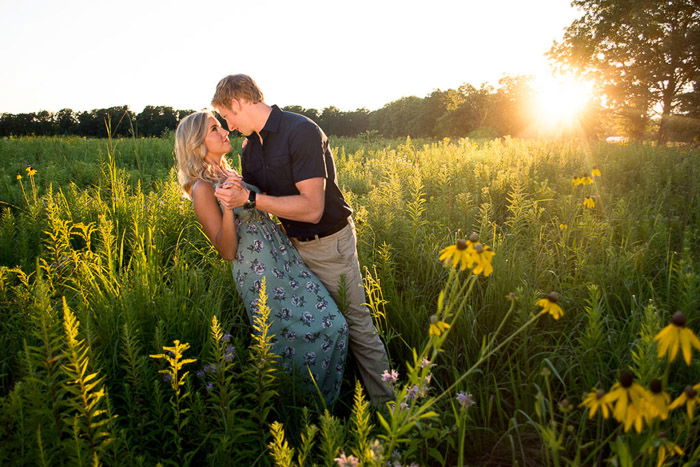
If you’re new to working with light, pay attention to the sun’s position for the best quality of light. For portrait photography, arrange your shot so that the sun is to the side. If you are not shooting a portrait, the sun should be in front of your subject. Don’t use front lighting from the sun for portraits, or you’ll get a squint.
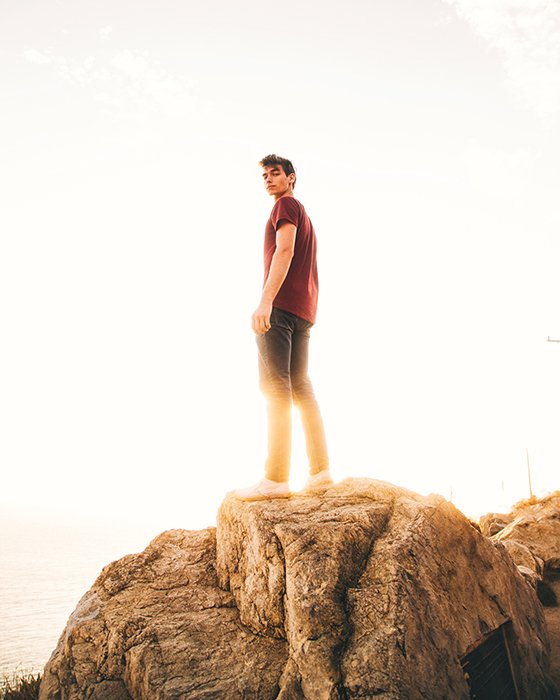
One of the best uses for the golden hour is back-lighting. Placing the sun behind your subject gives you that magical glow.
11. Choose the Best Golden Hour Camera Settings
Shoot in manual mode to make the most of back-lighting and to adjust exposure. Or in a semi-manual mode such as aperture priority with spot metering.
Spot metering tells the camera to expose for wherever the focal point is, instead of considering the entire scene. Without spot metering, you’ll most likely end up with a dark subject or even a silhouette.
On most DSLRs, there’s a physical shortcut for the metering mode. On many models, you can also adjust metering mode inside the menu.
Another great way to shoot with golden hour backlight is to use a reflector. Bounce some of the light back on the subject, creating a more even exposure. A low-powered flash with a diffuser also does the trick.
If I can’t juggle the reflector in the right spot, I use a hot shoe flash on-camera, but on a low setting with a diffuser. An orange gel is also helpful – the color helps the flash blend in with the ambient, or existing, light.
Golden hour settings vary based on the exact light and the subject. For portraits, I shoot with a low aperture, around f/1.8 to f/2.8. If I’m shooting a couple or a group, I use a narrower aperture to keep all the faces in focus.
I often use aperture priority mode and increase the ISO as the sun goes down. For landscapes, particularly if you use a tripod, you can keep the ISO low and lengthen the shutter speed as the sunlight wanes.
Another potential pitfall to look out for are lens flares. Adjust your position, use a lens hood or find a way to incorporate them artistically into the shot.
Back-lighting can sometimes be tough for budget lenses, so check your focus to make sure you got it sharp before leaving the scene.
The light changes quickly during the golden hour. You’ll want to watch your settings and adjust as the light fades. You might have to increase your ISO, widen the aperture or lower the shutter speed as the amount of sunlight decreases.
10. Avoid Unwanted Shadows
When taking portraits, the light direction has an important effect on how they will look. You should avoid vertical lights coming from above your model because they create ugly shadows on the face.
An especially unflattering effect in portrait photography is “raccoon eyes”. This is where the eyebrows cast a shadow over the eyes, making them look like dark circles. This is not the case with golden hour photos. The light comes from a low angle, illuminating the model’s face from the side, not from above.
You might need to deal with other shadows, but you can save yourself so much pain in post-processing just for avoiding the raccoon eyes effect.
9. Use the Warm Golden Hour Colors to Add Positive Energy
Colors are a strong compositional tool in photography that can be used to convey mood. One of the main traits of the golden hour is its characteristic color palette: yellows, oranges, reds.
All of these are warm colors (between 1000 and 4000 on the Kelvin colour-temperature scale). Warm colors evoke positive feelings such as happiness, excitement, and optimism. For that reason, images taken during the golden hours have positive energy associated with them.
It makes your photography look a bit magical, hence the golden hour’s nickname as “magic hour”.
Portraits also benefit from the golden hour because the quality of light makes skin tones look better. The yellow-red hue of the light makes the skin look warmer rather than neutral or cold.
8. Use Creative Side Light
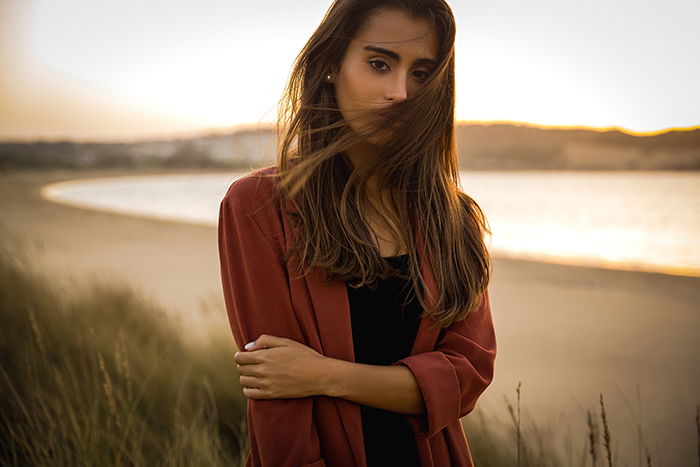
During the golden hour, sunlight hits the subject from only one side. This results in one side of your subject being shadowed. This is why it is also called split lighting.
Shadows add texture and depth to the portrait. They give it a different look than a front light. It also adds a bit of drama, but not as much as when you try this lighting in a studio.

7. Make the Most of Natural Backlight Photography
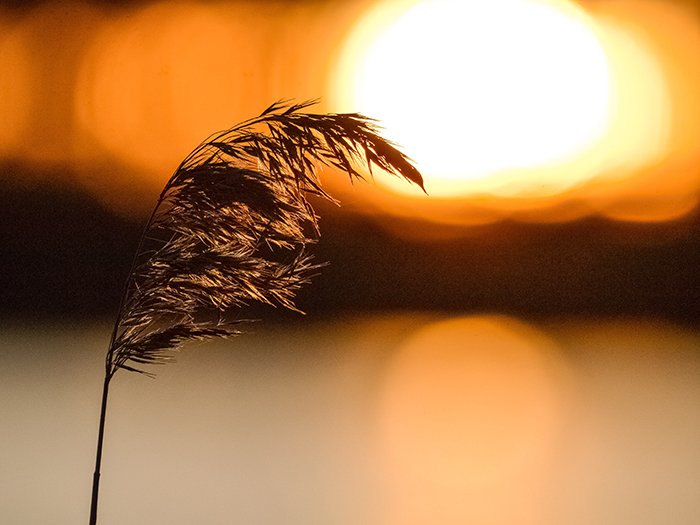
The light’s angle during golden hour is perfect for some backlight photography. This occurs when the light comes from behind your model/subject. And it gives you a lot of artistic possibilities.
You can get a dramatic effect when the object you are shooting has some degree of translucence. The translucent part of the subject will have a strong light intensity, and the opaque part will be darker. This makes the subject seem to glow.
It is even more evident when the background is dark. The contrast between the translucent and the opaque areas also makes the photo look more dynamic.
Translucent parts can be; hair, feathers, leaves, flowers, etc.
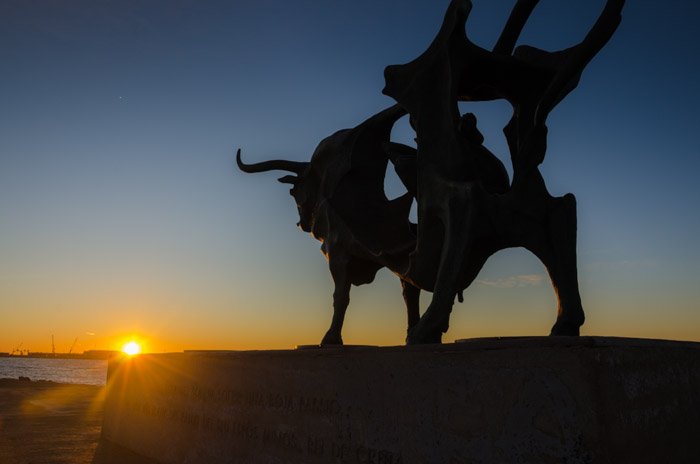
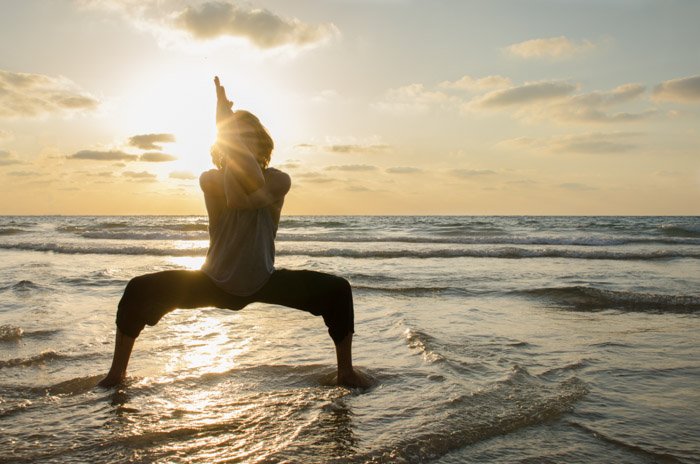
6. Shoot Towards the Sun to Create Silhouettes
The golden hour is a great opportunity to create silhouettes. A silhouette is when the subject of your photo is blacked out, and the background is well exposed. They work especially well with subjects that have an easily recognisable shape.
The high contrast with the subject and the lack of detail make silhouettes a great way to add drama and mystery to your photo. You can create them by shooting towards the light source (in this case the sun) and placing your subject between you and that source.
Exposure is important in order to get nice silhouettes. You need to set your exposure settings so that the brightest part of the image would be at optimal exposure. In our case, we want to capture the sky with all its colors and details. Under such settings, your subject will be extremely underexposed.
One thing that helps me when I am taking silhouettes is to imagine that the most important thing in the photo is the background. Then I expose the image to get it well. I use spot metering mode, and I meter by focusing on the background.
I adjust the exposure accordingly, and before taking the photo, I change the focus to the actual subject I want to shoot. The camera will say that it is underexposed, but that’s not a problem, we already have the settings the way we want them.
5. Have Fun With Starburst
Starburst is one of my favourite optical effects. Here’s how to create them.
First, set your aperture to a high value (ideally f/16 or f/22). Then, set the shutter speed and the ISO to underexpose the image by two stops. The sun will be in the frame. If you don’t underexpose it, you might end up with too much light in your photo.
Starburst is easier to get if you have the sun as small as possible. In other words, if the sun is a bit covered by something. When the sun is high in the sky, it might be difficult to find objects that can hide the sun. You might find yourself limited in terms of angles and perspectives.
But since the sun is in a lower position during golden hour. You can get interesting starburst then. You can use your model to cover the sun. Be creative and have fun! But be safe too. Don’t look directly at the sun. The lens concentrates the light just like a magnifying glass, so don’t use the eyepiece if you don’t have protection!
Instead, you can use the screen display and don’t forget to consult your camera manual for details.
4. Get Out Early to Avoid the Crowds
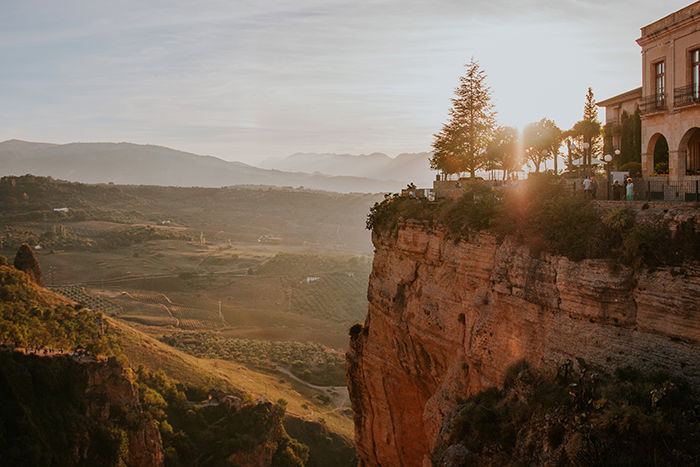
If you like taking photos of empty landscapes, early golden hour is a perfect time to take photos. Most people venture outside later. During these early hours, you can enjoy the beautiful golden hour light, a calm location and some privacy.
Another thing to take into account is cleanliness. In most places, cleaning is done at the end of the day or at night. If you wake up early, chances are that you will arrive at a clean location.
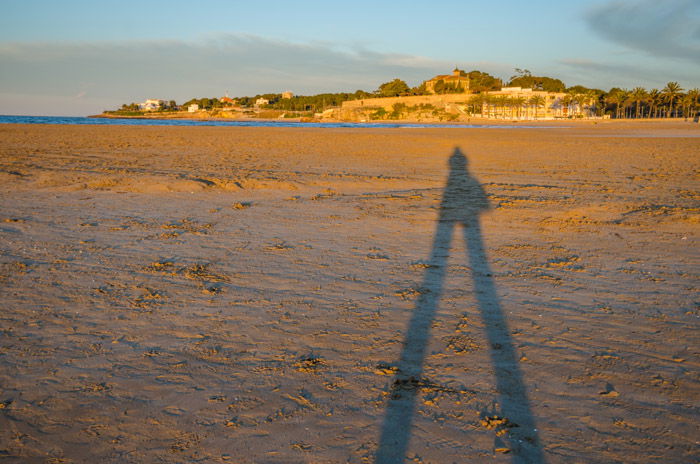
3. Use Long Shadows as Part of the Composition
Shadows add texture and detail to the image. They give a sense of volume and depth. During the golden hour, due to the position of the sun, you will have long shadows. You can use these to emphasise elements in the photo such as sand dunes, grooves etc.
You can also take photos of the shadows of your models. And you can use the shadows as a photo composition element. Shadows can balance the warm reds and yellows from the sun with their darker colors.
You should also remember your own shadow because it might get in the way and ruin the photo. This is especially important if you want to take photos with the sun behind you. Just be aware of your shadow and make sure to check where it is before you press the shutter release.
If your shadow is in the image, move around and place yourself so that your shadow falls outside of the photo frame. Unless you want to take creative photos with your shadows!
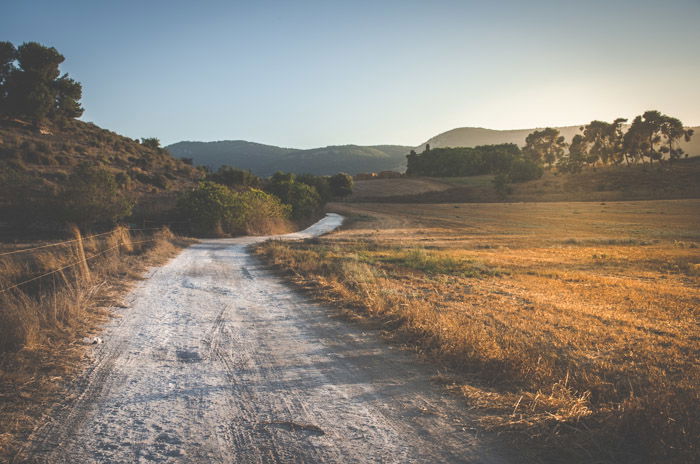
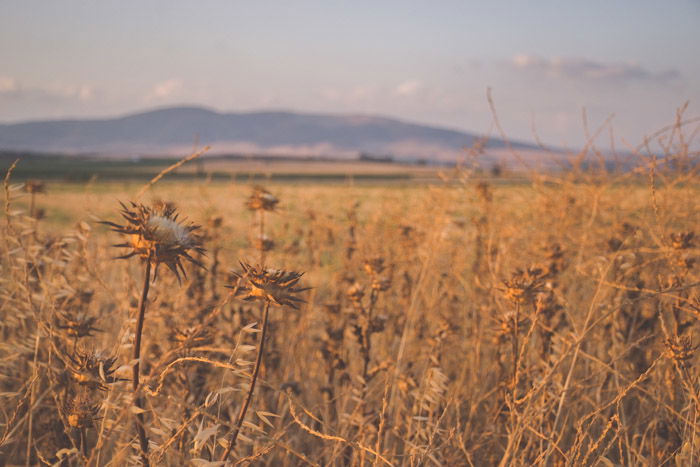
2. Make Everyday Sights Magical
Everything under this light seems beautiful and dreamy. You can use this to your advantage and take beautiful photos even when your subject might not look so spectacular. Dry vegetation, lonely trees, old fences, empty paths – these can all turn into photography subjects.
If you want to give a sense of nostalgia to your landscape pictures that might otherwise look barren or hard, I recommend you take photos during the golden hour. It adds gold tints and soft light effects that will make the image easier to relate to.
1. Capture the Most Beautiful Sunrises and Sunsets
I have always loved sunrises and sunsets. And since becoming a photographer, the number of sunrise and sunset I’ve witnessed has increased. It’s easy to miss these in our daily lives. We’re tired, or sleeping in, or busy doing other things.
Chasing the golden hour will give you the motivation to jump out of bed to catch that magical light. And you won’t regret it.
You will see beautiful scenes, and you will capture them with your camera. You can also bring your friends, family or even dates to keep you company. Or you can venture out yourself and enjoy some well-deserved peace and quiet.

Conclusion
Shooting during the golden hour has a lot of advantages. You can emphasise textures and get creative with long shadows. Try some backlight photography or have some fun creating silhouettes.
You will also enjoy some beautiful warm colors. Just take your camera and get ready to catch the golden lights of the sunrise and sunset!
Learning how to compose your images to take advantage of the Golden Hour? Take a look at some tips on using the Golden Ratio to compose your images with no complex maths involved. You should also check out these beautiful sunset photos for inspiration!